Inspired by the videos of HFT Shooter, especially Video 49, I designed a bullet trap that holds DIN A4 paper sheets as targets. It may be a bit over-engineered, but it has proven itself in practice.
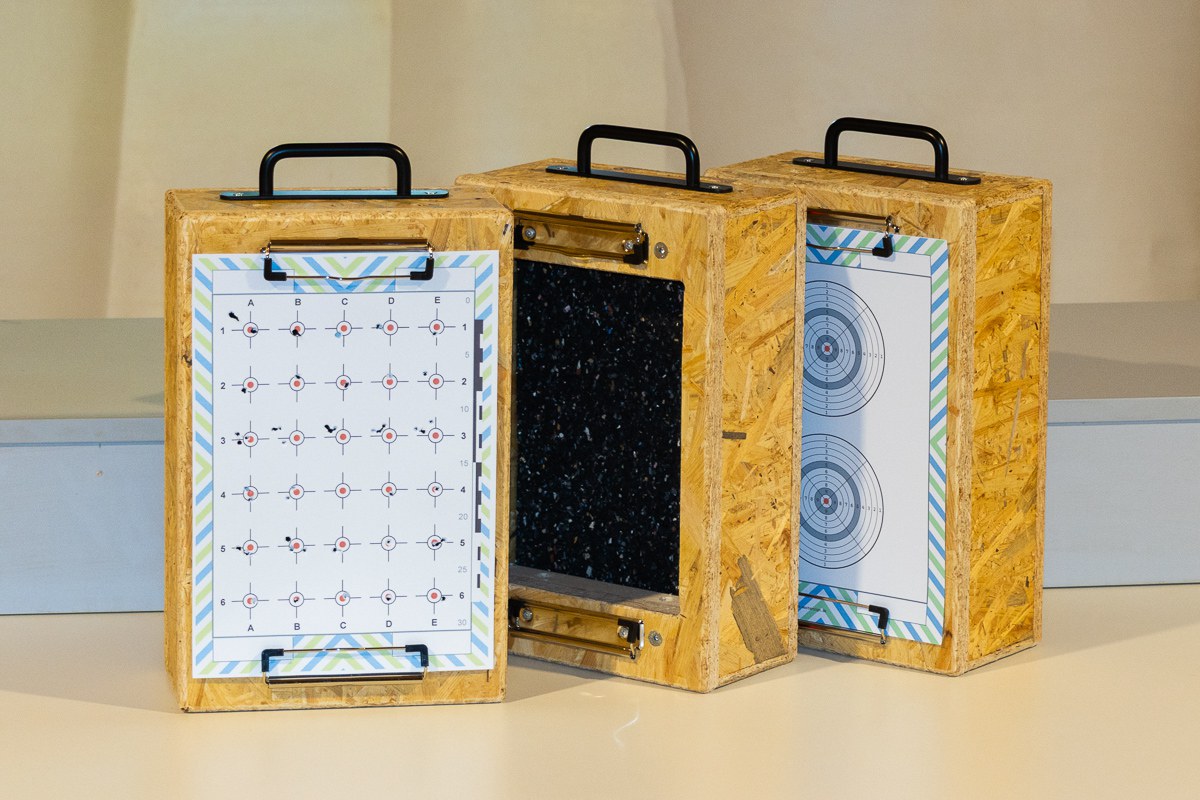
Bullet trap DIN A4
You can download the blueprints as a PDF file.
Corpus
I had some leftover OSB boards lying around, so I used them to build the box. Plywood panels should work just as well. I would not recommend particle board or MDF panels, as they are more brittle and less resistant to moisture. Solid wood is also a viable option, provided the box is not exposed to significant humidity fluctuations.
The back and front panels are 25 mm thick. This is beneficial because these panels endure greater stress and wear. For the side panels, I used 19 mm thick material to reduce the overall weight slightly and maximize the interior space.
For cutting the pieces, a table saw or a handheld circular saw with a guide can be used. However, when working with the relatively small workpieces, extra caution is required for safety, and the pieces must be securely clamped during cutting.
I cut rabbets on the pieces using a router table. A handheld edge router should also work. I assembled the box structure (excluding the front panel) with waterproof wood glue. Finally, I rounded the outer edges with a round-over bit, as OSB can be quite rough on the hands.
Removable Front Panel
The front panel features a centrally positioned opening that is 18 cm wide and approximately 24 cm high. An A4 sheet of paper is placed on the panel with a sufficiently wide border around the opening, ensuring it does not bulge into the opening even in windy conditions.
The front panel is attached to two square wooden beams using four M6 countersunk screws — one beam positioned at the top and one at the bottom. This allows the panel to be removed relatively easily to replace the filling or remove trapped pellets. The wooden beams are then secured to the top and bottom panels of the housing, each with two M5 countersunk screws. Both the M6 and M5 screws thread into metal threaded inserts embedded within the wooden beams.
For simplicity you can just as well use wood screws or quick‑assembly screws. The metal joint prevents wear even when the front is taken off frequently. And if you use wood screws, the worst‑case scenario is that only the cross‑bars have to be replaced to regain a solid hold.
Filling
I’ve experimented with a few different fillings. At the moment I’m quite happy with three layers of anti‑vibration mats for washing machines that I picked up at the hardware store. A single mat is usually about 60 × 60 cm in size and roughly 10 mm thick. They’re made from welded granulate of recycled rubber.
My fear that the diabolos would bounce off the rubber and fail to be caught turned out to be unfounded. On the contrary, I haven’t seen a single diabolo rebound from the filler—and this is true regardless of the shooting distance. This is different from the small 14 × 14 cm metal boxes, where a diabolo often springs back. Here the diabolos either get caught in the first layer of matting, or they push through to the second layer and stay there. Many of them fall between the layers, drop down, and remain essentially in their original shape.
The interior of the box is 19.2 cm wide and 31.2 cm high. If a mat is cut into six pieces, each measuring 19 × 30 cm, you can fully outfit one bullet trap twice with them. A carpet knife works well for cutting.
The rubber mats are loosely standing upright behind the wooden beams, so they can shift a little when a diabolo hits them and, in doing so, help dissipate energy.
Hardware
The A4 paper targets are held in place with two clipboard clamps. You can buy them without a clipboard as in a pack online. And the ones that are left over will surely find a use in the workshop or around the house.
A handle on the top makes transporting the box easier. After all, it is a little heavy. The handle is slightly offset toward the back because the boxes centre of gravity—due to the opening in the front and the filler at the rear—is not in the middle.
Blueprints
I modeled the backbox in Fusion 360 and created a few drawings that can be downloaded. They should provide anyone who wants to build the backbox with enough detail.
I deliberately left the depths and diameters of the pockets for the threaded inserts in the wooden beams un‑dimensioned, because they depend on the specific inserts and the length of the screws you’ll be using.
The exact locations of the hardware are also unspecified, since those measurements will almost certainly differ from my own.